
Spilled epoxy on your workbench. A cured drip on your dining table. A failed resin pour that hardened into a glossy mess. Epoxy bonds hard and fast, and once it sets, it feels permanent. It isn’t. Knowing how to remove epoxy from wood saves the surface, the project, and your weekend.
Epoxy resin grips wood fibers tightly, but the right combination of heat, solvent, and patience breaks that bond without wrecking the grain underneath. You don’t need a pro shop or expensive gear. You need the correct method for your situation and a steady hand.
This guide walks you through every step to strip cured or fresh epoxy from wood while keeping the surface intact and ready for refinishing.
Why Removing Epoxy from Wood Matters
A botched resin pour or stray spill doesn’t mean the piece is ruined. Learning to lift epoxy cleanly protects your investment. Replacing a hardwood tabletop costs hundreds. Fixing it costs a few dollars in solvent and an afternoon.
Skill here builds confidence fast. Once you’ve rescued one surface, you’ll stop fearing epoxy mistakes and start tackling bigger pours. That confidence pays off across every woodworking project you take on.
Clean removal also protects the wood itself. Aggressive scraping or the wrong chemical gouges the grain, raises fibers, and leaves stains that show through any finish. Done right, the wood looks untouched. Done wrong, you trade an epoxy problem for permanent damage. The method matters more than muscle.
Tools and Materials You’ll Need
Gather everything before you start. Switching tools mid-job lets epoxy re-harden and costs you progress.
- Soften the bond — heat gun or hair dryer
- Dissolve fresh spills — acetone or denatured alcohol
- Lift cured epoxy — plastic putty knife or flexible scraper
- Smooth the surface — 80, 120, and 220-grit sandpaper
- Tackle stubborn residue — commercial epoxy remover or paint stripper
- Protect yourself — nitrile gloves, safety glasses, respirator mask
- Control the workspace — drop cloth and clean rags
- Optional convenience — an oscillating multi-tool with a scraper blade speeds up large or thick deposits
Pick chemical strippers rated for epoxy resin. General-purpose removers often stall on fully cured surfaces and waste your time.
Step-by-Step Guide on How to Remove Epoxy from Wood
Step 1 – Assess the Epoxy and the Wood
Start by reading the damage. Press a fingernail into the epoxy. If it dents, the resin is still soft and solvent will dissolve it quickly. If it’s glass-hard and clicks under your nail, it’s fully cured and needs heat or mechanical removal.
Check the wood too. Raw, unfinished wood absorbs solvents and stains easily, so you’ll work more cautiously. Sealed or finished wood resists chemicals better but the finish underneath may lift along with the epoxy.
Note the thickness. A thin film wipes off. A thick, domed drip needs scraping first. This two-minute assessment decides every choice that follows and keeps you from grabbing the wrong tool.
Step 2 – Set Up a Safe Workspace
Epoxy removal releases fumes and fine dust. Open windows and run a fan to push air away from your face. Lay a drop cloth to catch debris and protect the floor.

Put on nitrile gloves, safety glasses, and a respirator before you open any chemical. Acetone and strippers irritate skin and lungs fast, and the sharp solvent smell is your warning to ventilate harder.
Clear the area of rags, sawdust, and anything flammable. Heat guns hit 1,000°F and ignite debris in seconds. A clean, open bench keeps the job safe and lets you move without knocking tools into wet solvent.
Step 3 – Soften Fresh Epoxy with Solvent
If the epoxy is still tacky, you’ve got the easiest version of how to remove epoxy from wood. Soak a clean rag with acetone and press it onto the spill. Hold it for thirty seconds so the solvent penetrates.
You’ll feel the resin turn gummy and soft. Wipe in one direction, lifting the residue onto the rag rather than smearing it deeper into the grain. Switch to a fresh section of cloth often.
Acetone evaporates fast, so reapply as needed. On raw wood, work quickly and blot rather than flood the surface. The spill should lift cleanly, leaving a slightly damp patch that dries in minutes with no sticky film behind.
Step 4 – Apply Heat to Cured Epoxy
Cured epoxy won’t budge with solvent alone. Heat breaks the bond instead. Set your heat gun to medium and hold it two to three inches above the surface. Move it in slow, steady circles.
Watch the epoxy closely. Within thirty to sixty seconds it softens, turns slightly cloudy, and loses its hard shine. That’s your signal. You may hear a faint crackle as the resin loosens its grip on the wood fibers.
Keep the gun moving. Holding it still scorches the wood and leaves dark burn marks that no finish hides. If you smell burning or see smoke, you’re too close or too slow. Steady motion and patience protect the grain.
Step 5 – Scrape Away the Softened Epoxy
While the epoxy is warm and pliable, work fast. Angle a plastic putty knife at about 30 degrees and push it under the softened edge. The resin should peel up in soft, rubbery ribbons.
Use plastic, not metal. Metal blades gouge wood and leave scratches that telegraph through every coat of finish. If the epoxy hardens again before you reach it, reheat that section and continue.
You’ll feel the scraper glide once you find the right angle. Wood that’s clearing properly looks matte and clean, with no glossy patches left behind. Collect the peeled bits on your drop cloth and keep your blade edge clear so it bites cleanly each pass.
Step 6 – Treat Stubborn Residue with Chemical Stripper
Thin films and stubborn spots resist both heat and scraping. This is where chemical epoxy remover earns its place in learning how to remove epoxy from wood. Brush a thick, even coat over the residue and let it dwell.
Follow the label timing, usually five to fifteen minutes. The surface bubbles and wrinkles as the stripper breaks down the resin. Don’t rush it. Removing the stripper early leaves a half-dissolved mess that’s harder to clear.
Once it’s fully softened, scrape gently with your plastic blade. The residue lifts in a gel-like sludge. Wipe the area with a rag dampened in denatured alcohol to neutralize any leftover chemical and reveal the bare wood beneath.
Step 7 – Sand the Surface Smooth
Removal always leaves traces — faint epoxy film, raised grain, or slight unevenness. Sanding restores a uniform surface. Start with 80-grit to knock down stubborn spots and any hardened flecks you missed.
Sand with the grain, never across it. Cross-grain scratches catch light and ruin the finish. Move up to 120-grit, then finish with 220-grit for a smooth, even feel.
Run your bare hand across the wood between grits. It should feel consistently smooth with no glossy ridges or sticky patches. Wipe away dust with a tack cloth as you go. The surface should look clean, matte, and ready, with the natural grain showing through clearly.
Step 8 – Clean and Prepare for Refinishing
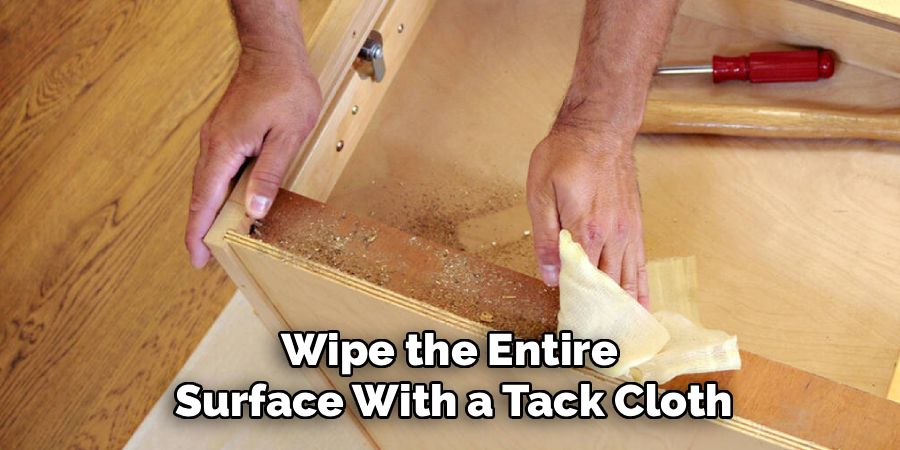
Sanding leaves fine dust packed into the grain. Wipe the entire surface with a tack cloth or a rag lightly dampened in denatured alcohol. This pulls out residue and shows any spots you missed.
Inspect under angled light. Tilt your head and look across the surface — leftover epoxy shows as faint glossy patches against the matte wood. Mark those spots and spot-sand them now, before you finish.
Let the wood dry completely if you used any liquid. Damp wood traps moisture under stain or sealer and causes blotching. Once it’s dry, smooth, and uniformly matte, the surface is ready for stain, oil, or a fresh finish to bring the grain back to life.
Common Mistakes to Avoid
The biggest mistake is rushing the heat step. Beginners crank the heat gun too high or hold it in one spot, scorching the wood before the epoxy even softens. Those burn marks are permanent and force a deeper sanding job that thins the surface. Keep the gun moving and let warmth do the work.
Reaching for a metal scraper is another costly error. Metal digs into soft wood the instant the epoxy gives way, leaving gouges and scratches that show through every coat of finish. Plastic blades flex and glide. They protect the grain while still lifting the resin.
Many people skip safety gear because the job looks simple. Acetone fumes and stripper vapors build up fast in a closed room. Without a respirator and ventilation, you risk headaches, dizziness, and lung irritation. Protect yourself every time.
Drowning raw wood in solvent backfires too. Excess acetone soaks into the grain, raises fibers, and leaves dark stains that resist finishing. Apply solvent sparingly and blot rather than flood. Finally, don’t skip the final sanding. Invisible epoxy film blocks stain absorption and creates blotchy, uneven results.
Expert Tips
Test your method on a hidden spot first. The underside of a tabletop or a back edge tells you how the wood reacts to heat or solvent before you touch the visible surface. This single habit prevents most disasters.
Chill small epoxy drips with ice or a freeze spray. Cold makes cured resin brittle, and a sharp tap pops it off cleanly with almost no scraping. It works beautifully on thin, isolated spots.
Work in shallow layers on thick pours. Soften and scrape one level, then repeat. Trying to lift a deep deposit in one pass overheats the wood and dulls your blade.
Keep two rags going — one for solvent, one for wiping clean. Cross-contaminating them just redeposits dissolved epoxy back onto the grain.
Frequently Asked Questions
Can You Remove Cured Epoxy Without a Heat Gun?
Yes. A chemical epoxy remover or paint stripper rated for resin dissolves cured epoxy without heat. Brush it on, let it dwell for the labeled time, then scrape with a plastic blade. It works slower than heat and demands good ventilation, but it’s effective on flat surfaces and safer near veneers or delicate finishes that high heat would damage.
Will Acetone Damage My Wood?
Acetone is safe on wood when used sparingly. It strips finishes and can raise grain or leave faint stains on raw wood if you over-apply it. Blot rather than soak, work in one direction, and wipe immediately. Acetone evaporates fast and leaves no lasting residue, so quick, controlled application protects the surface while dissolving fresh epoxy.
How Do I Remove Epoxy Without Damaging the Wood Finish?
Protect an existing finish by skipping heat and harsh solvents. Use a freeze spray to make small drips brittle, then pop them off with a plastic blade. For larger areas, apply a gentle finish-safe stripper and test a hidden spot first. Sand lightly with 220-grit only if needed, then buff to blend the repaired area.
Why Won’t My Epoxy Come Off Even After Sanding?
Sandpaper clogs fast on partially cured or gummy epoxy, smearing it instead of removing it. The resin needs to be fully hard or fully softened first. Apply heat or chemical stripper to break the bond, scrape the bulk away, then sand the bare wood. Use fresh 80-grit and clear the paper often to keep it cutting.
Is It Cheaper to Remove Epoxy or Replace the Wood?
Removal almost always costs less. A bottle of acetone, a chemical stripper, and sandpaper run under twenty dollars and save a tabletop worth hundreds. Replacement means new material, more labor, and matching grain and finish. Unless the wood is split or structurally compromised, removing the epoxy and refinishing is the smarter, cheaper fix.
Conclusion
Epoxy on wood looks like a disaster, but it’s a fixable one. The method beats muscle every time. Assess the resin first, soften it with solvent or heat, scrape with plastic, then sand the surface clean and smooth. Follow that order and the wood comes back looking untouched.
Take your time on the heat step, protect yourself with proper gear, and test your approach on a hidden spot before committing. Those three habits separate a clean rescue from a permanent scar.
You now know how to remove epoxy from wood without gouging the grain or burning the surface. The same steps work on a spilled drip, a failed pour, or a years-old hardened mess. Each repair builds the confidence to tackle bigger projects without fear of mistakes.
Grab your tools, set up your space, and reclaim that surface. The wood underneath is worth saving — and you’ve got everything you need to do it right.
