
You spread Citristrip across an old dresser, watched the orange gel bubble up the paint, and now you’re left with a sticky, gooey mess. What comes next matters just as much as the stripping itself. Knowing how to clean Citristrip off wood is the step that separates a smooth, refinish-ready surface from a blotchy, tacky disaster that ruins your stain or topcoat. Leftover stripper residue can keep wood from accepting finish, leaving cloudy patches and soft spots for weeks.
The good news? Cleanup is simple once you know the right tools and the right order of steps. This guide walks you through the entire process, from scraping off the gunk to prepping bare wood for its fresh new finish.
Why Proper Citristrip Cleanup Matters
Skipping or rushing the cleanup phase is one of the fastest ways to wreck a refinishing project. Citristrip is a paint stripper that stays active long after you apply it. If you leave residue behind, it keeps working under your new finish, breaking down stain and softening varnish from below.
Learning to clean it correctly saves you real money. You avoid buying replacement wood, redoing botched stain jobs, or scrapping a piece you loved. It also builds confidence. Once you master chemical stripper cleanup on one project, you can tackle doors, cabinets, railings, and antiques without fear.
Clean wood accepts finish evenly. That means richer color, smoother coats, and results that look professional instead of patchy. This single skill protects every refinishing project you ever start.
Tools and Materials You’ll Need
Gather everything before you begin so you’re not hunting for supplies mid-cleanup. Here’s what makes the job go smoothly:
- Plastic putty knife or scraper – lifts gel without gouging the wood
- Mineral spirits – dissolves and neutralizes leftover stripper residue
- Coarse steel wool (#1 or #2) – scrubs goo out of grain and crevices
- Clean cotton rags or shop towels – wipe away dissolved residue
- Stiff nylon brush – reaches carvings, grooves, and detailed corners
- Disposable gloves and safety glasses – protect skin and eyes from chemicals
- Metal or glass container – holds spent gel and soiled rags safely
- Drop cloth or plastic sheeting – catches drips and protects your workspace
- Water and clean sponge – final rinse for water-rinsable formulas
- (Optional) Afterwash or stripper neutralizer – speeds prep for fast finishing
Step-by-Step Guide on How to Clean Citristrip Off Wood
Step 1 – Confirm the Stripper Has Finished Working
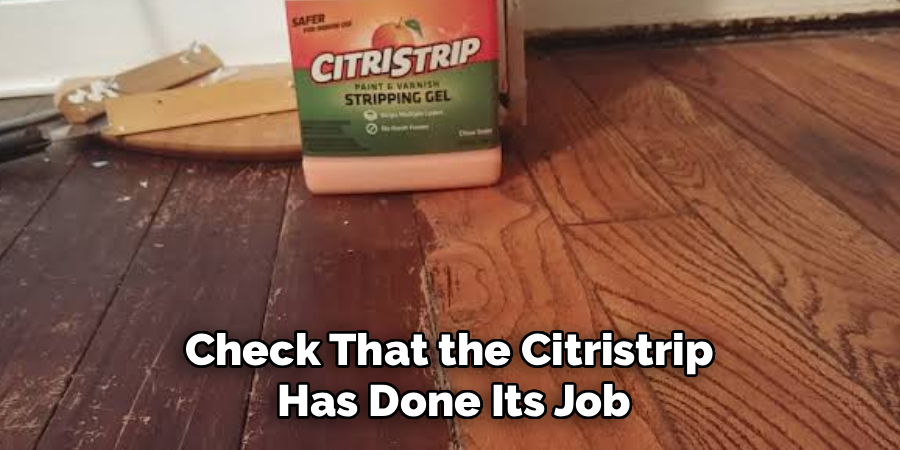
Before you touch anything, check that the Citristrip has done its job. The gel should look darker and slightly dried at the edges, with paint visibly wrinkled and lifted. Run a plastic scraper across a small spot. If the finish peels away in soft ribbons, you’re ready. If it still clings stubbornly, give it more time.
You’ll usually wait 30 minutes to 24 hours depending on how many layers you stripped. Patience here pays off. Scraping too early forces you to reapply stripper and start over, doubling your work. The surface should feel like wet putty, not hard plastic. Once it scrapes clean with light pressure, move on to lifting the bulk of the mess.
Step 2 – Scrape Off the Bulk Residue
Hold your plastic putty knife at a low angle and push it across the wood with steady, even strokes. The dissolved finish should roll up like cold pudding, gathering ahead of the blade. Work in the direction of the grain to avoid scratching the soft, exposed wood underneath.
Wipe the gunk into your metal or glass container after every few passes. This keeps your work area clean and stops you from smearing residue back onto bare spots. You’ll hear a quiet scraping sound, not a harsh scratch. If you feel the blade catching or gouging, ease your pressure. Get as much sludge off as you can now. The less goo you leave, the easier the chemical cleanup becomes in the next steps.
Step 3 – Tackle Grooves and Detailed Areas
Flat surfaces are easy. The carved trim, spindles, and corners are where Citristrip loves to hide. Grab your stiff nylon brush and work the bristles into every groove, scrubbing along the grain. You’ll see softened residue flake and roll out of the detail work.
For tight spots the brush can’t reach, twist a piece of steel wool into a point or use an old toothbrush. Coarse steel wool digs into open grain and pulls out gummy bits that scrapers leave behind. Take your time on antiques and ornate pieces, since trapped residue shows up later as dark, sticky lines. This stage is fiddly, but skipping it means uneven finish in exactly the spots people notice most.
Step 4 – Apply Mineral Spirits to Dissolve Remaining Residue
Now comes the heart of how to clean Citristrip off wood. Soak a clean rag or pad of steel wool in mineral spirits, then wipe it firmly across the surface. The solvent breaks down the thin, oily film of stripper that scraping always leaves behind. You’ll smell a sharp, petroleum scent, so keep your workspace ventilated.
Work in small sections so the spirits don’t evaporate before you wipe. The wood should start to look matte and dry rather than slick and shiny. Flip your rag often, or grab a fresh one, because a dirty rag just spreads residue around. This neutralizing step is what stops the stripper from attacking your future finish from underneath.
Step 5 – Scrub Stubborn Spots With Steel Wool
Some areas fight back, especially old layers of oil paint or thick varnish. Dip your coarse steel wool in mineral spirits and scrub these patches in long strokes that follow the grain. You’ll feel the resistance fade as the gummy residue gives way and lifts onto the steel wool.
Listen for a smoother, softer sound as the surface cleans up. A gritty, dragging feel means there’s still gunk to remove. Keep a rag handy to wipe the loosened residue away immediately so it doesn’t dry back onto the wood. Don’t press so hard that you score the surface. Let the solvent do the work while the steel wool simply guides it. Repeat until the wood feels clean and uniform under your fingertips.
Step 6 – Wipe the Surface Clean
Once the residue is dissolved, wipe the entire piece down with fresh, dry cotton rags. Move with the grain and overlap your strokes so you don’t miss any spots. The rag should pick up a faint orange or brown tint at first, then come away clean as the surface clears.
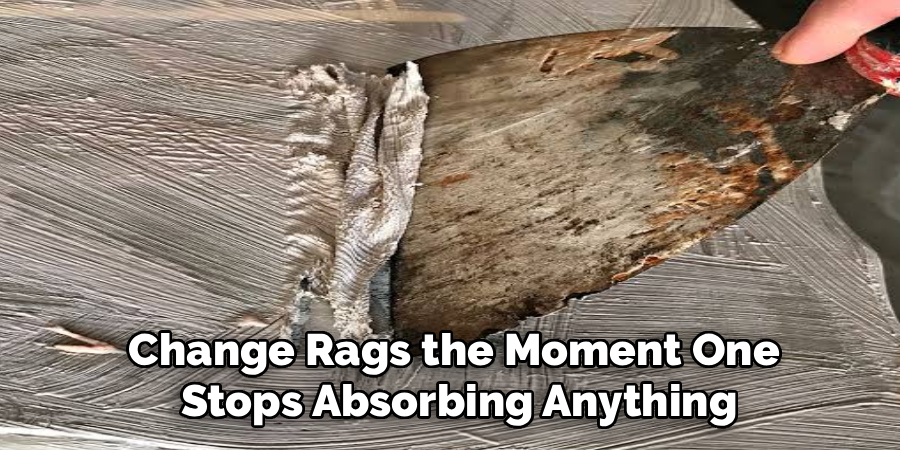
Change rags the moment one stops absorbing anything. A saturated rag only redeposits the gunk you just lifted. Pay attention to how the wood feels: clean wood is dry and slightly rough, never tacky or oily. Run your bare hand over it once your gloves are off. If your fingers stick or smear, there’s still residue, and you’ll want to repeat the mineral spirits pass before going further.
Step 7 – Rinse and Neutralize
Mastering how to clean Citristrip off wood means making sure nothing active stays behind. If you used a water-rinsable formula, wipe the surface with a damp sponge and clean water, then dry it right away with a towel. Don’t soak the wood, since standing water raises the grain and can warp thin panels.
For oil-based formulas, a second wipe with mineral spirits or a dedicated afterwash finishes the neutralizing job. The surface should look consistent in color with no glossy streaks. This rinse clears out the last invisible film that scraping and solvent left behind. Skipping it is the number one reason finishes fail to cure, so give your wood this final, careful pass.
Step 8 – Let the Wood Dry Completely
Patience wins again at the finish line. Set your piece in a dry, well-ventilated spot and let it sit for at least 24 hours. The wood needs to release every trace of solvent and moisture before you sand or stain. Rushing this traps fumes under your finish and leads to bubbling or slow drying later.
You’ll know it’s ready when the surface feels bone-dry and smells neutral, with no chemical sharpness lingering in the grain. Touch a few spots to confirm there’s no leftover tackiness. Good airflow speeds things up, so crack a window or run a fan nearby. Once the wood is fully dry and clean, you’re set for sanding and your fresh finish.
Common Mistakes to Avoid
The biggest mistake people make is rushing the wait time. They scrape too soon, leave half the finish stuck to the wood, and end up reapplying stripper over and over. Let the Citristrip fully soften before you lift it, and your cleanup goes twice as fast.
Another common error is skipping the mineral spirits pass entirely. Scraping alone never removes the thin chemical film that stays behind. That film keeps working under your stain or topcoat, causing cloudy patches, soft spots, and finishes that simply won’t cure. Always neutralize before you move on.
Many beginners also use metal scrapers on bare wood and gouge the surface. Soft, freshly stripped wood scratches easily, so a sharp blade leaves marks that show through stain. Stick with plastic scrapers and let solvent handle the rest.
Reusing dirty rags is another quiet trap. A saturated rag spreads residue around instead of removing it, so you end up smearing gunk across clean wood. Swap rags often. Finally, don’t finish too soon. Wood that still feels tacky isn’t ready, and staining it locks moisture and solvent underneath, ruining all your hard work.
Expert Tips
Work in the shade or indoors. Direct sun dries the stripper and mineral spirits too fast, so the chemicals stop working before they finish lifting residue. Cooler, slower evaporation gives you cleaner results.
Keep a second container of fresh mineral spirits just for your final wipe. The first batch gets dirty quickly, and using clean solvent at the end guarantees a residue-free surface.
Wipe a small test patch with stain after drying. If the color soaks in evenly, your cleanup worked. If it beads or blotches, there’s still residue hiding in the grain.
Save your steel wool scrubbing for the same direction every time. Cross-grain scrubbing leaves swirl marks that catch light and show up under finish. Consistency here is what makes amateur work look professional.
Frequently Asked Questions
Do I Have to Use Mineral Spirits After Citristrip?
Yes, in most cases. Scraping removes the bulk of the gel, but a thin chemical film always stays behind. Mineral spirits dissolve and neutralize that residue so your new finish can cure properly. If you used a water-rinsable Citristrip formula, you can rinse with clean water instead, though many refinishers still prefer a mineral spirits wipe for the cleanest possible surface.
How Long Should I Wait Before Staining the Wood?
Wait at least 24 hours after your final cleanup pass. The wood needs time to fully release any leftover solvent and moisture. Staining too early traps chemicals under the finish, leading to slow drying, blotchy color, or a coat that never hardens. Confirm readiness by touch and smell: the surface should feel completely dry and carry no sharp chemical odor before you begin staining.
Can I Use Water Instead of Mineral Spirits to Clean Citristrip?
Only if you used a water-rinsable formula. Some Citristrip products are designed for water cleanup, and a damp sponge works fine for those. For oil-based formulas, water won’t dissolve the oily residue and may raise the grain or warp thin wood. Check your product label first. When in doubt, mineral spirits handle both situations and leave the most reliable, finish-ready surface.
Why Does My Wood Still Feel Sticky After Cleaning?
Stickiness means there’s still active stripper residue on the surface. You likely skipped or rushed the mineral spirits step, or you reused a dirty rag that spread the gunk around. Soak fresh steel wool in clean mineral spirits, scrub with the grain, and wipe immediately with a clean rag. Repeat until the wood feels dry and rough rather than tacky, then let it dry fully.
Is Citristrip Cleanup Safe to Do Indoors?
You can clean indoors with proper ventilation. Open windows, run a fan, and avoid enclosed spaces with no airflow. Mineral spirits release strong fumes, so wear gloves and safety glasses and take breaks for fresh air. Dispose of soiled rags in a sealed metal container, since solvent-soaked rags can be a fire risk. With airflow and basic precautions, indoor cleanup is both safe and practical.
Conclusion
Cleaning up after stripping isn’t the glamorous part of a project, but it’s where great refinishing work is truly made. Now that you know how to clean Citristrip off wood, you can move through every step with confidence: wait for the gel to soften, scrape off the bulk, dig residue out of the details, dissolve the film with mineral spirits, scrub stubborn spots, wipe clean, neutralize, and let the wood dry completely.
Each step protects the next. Clean, dry wood accepts stain evenly and holds a topcoat that lasts for years. Skip the shortcuts, swap your rags often, and let patience guide your timing. Master this process once, and you’ll never fear a refinishing job again, whether it’s a tired old chair or a treasured family heirloom. Grab your gloves, ventilate your space, and give that wood the fresh start it deserves. Your next beautiful finish begins with a properly cleaned surface.
